Snow Blowers


Inspecting the belts on your snowblower

April 14th, 2015 ernie Posted in Repairs & Mtce | No Comments »

Inspecting the belts on your snowblower
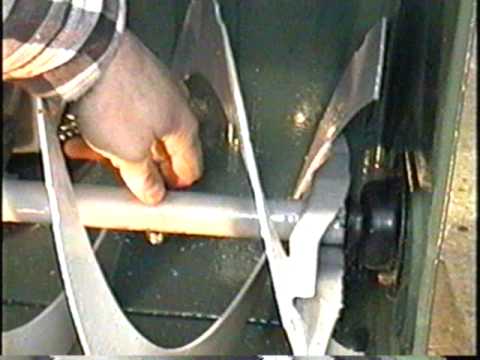
There are usually two belts on most two-stage snowblowers. One belt is required to drive the auger while the other belt is required to drive the wheels. They usually last for quite a few years however on older snowblowers operators should check them on an annual basis looking for wear and tear abrasions and cracking. It is fairly easy inspecting the belts on your snowblower and we recommend that you open your manual and confirm the location of the belt cover and how best to remove it.

The plastic belt cover is secured by two bolts which can be removed using a small wrench. Once you remove the belt cover on your snowboard, inspect the belt for cracks and where. Replace the belt if needed. If you’re going to replace the belt take a picture first so that you can refer to it when you’re installing the new belt and you want to refer to it and install it exactly as removed.

Inspecting the belts on your snowblower

If you’re finding that the forward motion of the snowboard is slowing down under heavy loads, or the snow is not being shown as far as it normally would there’s a chance that the older belts have begun to stretch. There are two ways to deal with this problem. The first is to adjust the pulleys to make sure that the belt is tight. You will notice the belt tightener probably has an adjustment to allow you to tighten the belt. The second alternative is of course to replace a belt. Make sure that the replacement belt is the right size both in diameter as well as in the width and depth of the belt.

Once the belt is installed replace the cover and test your snow blower. Restart it and confirm that the forward speed as well as the auger is running properly. Most operator owners of snow blowers prefer to do their maintenance during the summer or fall months. It is warmer rather than when it’s very cold outside
and difficult to work.

AddThis Social Bookmark Button

Oil change on a Snow Blower

April 7th, 2015 ernie Posted in Maintenance | No Comments »

oil change on a snow blowerThe oil in all small engines, including snowblowers should be changed at least once per year and more often if The snowblower is used on a regular basis. Follow the instructions that are included in your manual for the frequency of a Oil change on a Snow Blower engine.

Always check the level of oil in your engine by checking the dipstick. Make sure the snowblower is on level ground, pull up the dipstick wipe it clean with a cloth and put the dipstick back in completely. Wait for 10 seconds and then pull out the dipstick and confirm that the level of oil in the engine is at the correct level. At the same time assess the color of the oil to determine if it should be changed. A light yellow brown looking oil is in good condition while a thick black oil is in very bad condition. You should change your oil in your snow blower a long time before it turns black.

Oil change on a Snow Blower – Owners Manual

Review the owner’s manual for instructions on how to change the oil. Make sure the engine is turned off and remove the oil plug to drain the used oil into a receptacle. I sometimes find that a short piece of garden hose attached to the oil drain serves to make sure that the oil drains properly and easily into a receptacle.

Once all of the oil has been drained, replace the drain plug. Then tighten the plug so that it is sealed properly. Refill the engine with the proper amount of the recommended oil as per your manual. Inspect for leaks around the drain plug and be sure that it’s tight. Once the oil is at the proper level, restart the engine. Let it run for three or four minutes and then turn it off. Recheck the level of oil in the engine as previously mentioned. Top up as necessary or remove if needed.

This job can easily be done in less than 30 minutes. It is something that most do it yourself handyman can do around the home. You can dispose of the old oil by taking it in a proper container to most recycle facilities.

AddThis Social Bookmark Button

Flat Roof Snow Removal

March 31st, 2015 ernie Posted in Roof Snow Removal | No Comments »

Flat Roof Snow RemovalThis is not exactly a flat roof and this is definitely not the way to remove snow from a roof. The probability of damaging this roof with the backhoe is extremely high. It is almost a given that it will happen. All it takes is one accidental brush with the bucket and the shingles are broken allowing water to penetrate the spring causing a great deal more damage from water leakage. Flat Roof Snow Removal is very risky. And that is assuming that the operator is extremely careful and does not make any major mistakes. He could actually put the bucket right through the roof if he pulls a lever the wrong way!

Flat Roof Snow Removal – The Way to Do It

The only way to remove snow from a roof is to shovel it off by hand to ensure that no damage is done to the shingles. In cold weather, the shingles are brittle and will crack easily. Even if you are using a shovel and walking on the roof, it is better to leave a couple of inches of snow on the roof to protect the shingles and avoid any damage to the shingles which could lead to further water damage from leaks.

Flat roof snow removal will take more work since the snow will not slide easily off the roof. Nevertheless, if the snow load is too great, someone will need to get up on the roof to remove the snow.

Some consumers will also use a snow rake to clear snow off their roofs. This is a shovel with a long pole attached. The shovel is vertical to the roof allowing it to be pulling snow ahead of it off the roof. This type of snow removal can be accomplished from ground level with no danger to the person removing snow. There is also no danger of damaging shingles as well since no one is walking across the roof. A snow rake can also be used on flat roofs to reduce the amount of foot traffic on the roof. Avoid collapsed roofs and remove much of the snow to reduce the weight on your roof.

AddThis Social Bookmark Button

Snow Thrower for Flat Roof

March 21st, 2015 ernie Posted in Roof Snow Removal | No Comments »

Snow Thrower for Flat RoofIs there such a thing as a safe snow thrower for a flat roof? We do not think so. We certainly do not recommend the approach this homeowner is taking to clear snow off his roof. It is simply too dangerous on a number of levels to warrant taking the chance on using a snow thrower on your roof. We also wonder how he got it up there in the first place. We will not even speculate since that might give readers the idea. Even though there are risks, they might try it instead of using an old fashion shovel to remove the snow from their flat roofs.

Snow Thrower for Flat Roof – Issues to Consider

First of all, there is the inherent challenge to raise a heavy snow thrower up to the roof. You could damage the building and may hurt someone. Sure you could probably figure out how to do it safely, but is it really worth the effort given the following issues?

Consumers must also avoid getting too close to the edge of the roof. It is a long way down and once the snow thrower goes over the edge even with one tire. There is no way the operator can hold onto it and prevent it from falling.

The tires and the scraper on the snow thrower can potentially damage the shingles. Or the rubber membrane that is found on flat roofs. If a hole is punched in the membrane, water leaks are going to take place for sure and cause a lot more damage. At the very least, shingles will crack. They may even break off causing long-term damage and shortening the life span of the roof.

Not all roofs are designed the same. Some can support a great deal of weight in terms of snow load and one person walking on the roof. Add a heavy snow thrower to the roof and there is no telling what will happen.

We strongly suggest that the snow should be shoveled off the roof taking care to avoid damaging the roof in any way.

AddThis Social Bookmark Button

Snowblower tire chains scratch paver driveway

March 14th, 2015 ernie Posted in Tire Chains | No Comments »

Snowblower tire chainsNever use Snowblower tire chains on a driveway that has interlocking stone installed on it. The tire chains on a snowblower, car or truck will scratch the driveway for sure. In addition if you are using a snow clearing service, make sure they use a Teflon blade. A teflon blade will avoid scratching the driveway. If your snow clearing company cannot provide this service, or will not talk about it, or worse gloss over it, then try another company. Once your driveway is damaged, the only way to correct the damage is to replace the stones on your driveway, which can be very expensive.

Snowblower tire chains – Avoiding the Issue

Many companies offer this service at no extra cost however you will need to specify this in your contract. If you plan to clear your own snow from your driveway and have tire chains, remove them and only rely on the rubber tires. Although your snow blower may slip a bit it is much better than scratching your pavers with tire chains. In addition, Teflon skid shoes can be purchased for your snow blower. These skid shoes go on the bottom of the housing which comes in contact with your driveway. They will not mark your driveway and only cost a few dollars to purchase. Most people can install their own skid shoes.

Consumers should also remember that snow plow operators do not want to have any problems with their customers and certainly not cause any damage that they would be responsible for. Make sure that your requirements are always clear and written down in the contract to ensure that both parties are clear about the requirements. This way there is no room for any misunderstandings. Also check in with neighbors or previous customers who have used this service in the past to confirm service levels and general satisfaction levels.

For more about using tire chains on your snow blower, click here.

AddThis Social Bookmark Button

Snow Thrower for Flat Rubber Roof

March 7th, 2015 ernie Posted in Roof Snow Removal | No Comments »

Snow Thrower for Flat Rubber RoofLet’s start this post by saying we do not recommend the approach shown in this picture on the left. We do not know how he got the snow blower onto the roof. We certainly cannot suggest that consumers even remotely think about this type of solution to get the snow off their roofs.  There is no such thing as a Snow Thrower for a Flat Rubber Roof. This looks like a flat roof. That usually means it has a rubber membrane to seal the roof or perhaps a tar-based membrane. Either way, the amount of damage that can be done to the roof by using a snow blower on the roof is huge. Gauging holes in the roof, and scraping some of the shingles and tar or rubber of the roof is just the beginning.

Snow Thrower for Flat Rubber Roof – Damages

Using any heavy equipment that can scrape shingles or tear a hole in the roof is just something you do not want to do. Any tear in the fabric allows moisture to enter the roof structure. Then into the building below, in this case, the house. If this is a flat roof, then the water from the snow when it melts is just going to pour through this hole and into the home.

Water damage spreads quickly, especially if it is a large leak. If it is a large leak then at least it will be noticed right away since the water will just pour in. If it is a small leak then the water will drip in. It will spread slowly causing mold and damage to the insulation, the structure, and the drywall. This can lead to thousands of dollars in damages.

There is also a safety issue. Suppose you get too close to the edge. Both the operator and the snow blower could fall off the roof causing further damage. In addition, some roofs have weak points that a heavy snow blower could fall through.

We strongly advise that the snow should be shoveled off the roof. Never use a snow blower on any roof! A roof is built to handle the snow load. Not a concentrated heavy load like a person and a snow blower.

AddThis Social Bookmark Button

Changing shear pins on your snowblower

February 28th, 2015 ernie Posted in Repairs & Mtce | No Comments »

Changing shear pins on your snowblowerShear pins in any piece of equipment including snowblowers are meant to break when the piece of equipment is put under too much stress. If the auger becomes blocked somehow this shear pin will break in order to protect the engine and the gear mechanism. Shear pins should never be replaced with any other kind of bolt. It is a safety feature that brakes and protects your gear case in your snowblower. Changing shear pins on your snowblower is also relatively easy.

Each year when you’re doing your annual maintenance, the shear pins should be inspected to ensure that they are not broken or missing. When they do break in most cases they will fall out on their own.

Changing shear pins on your snowblower

If you do need to install new shear pins always use the exact replacement pins that are recommended. Your manual will provide information on the kind of shear pin that you should be used. Also make sure that the engine is turned off . Make sure that there is no danger of the auger turning while you are replacing the shear pin.

It is always a good idea to have an extra set of shear pins on hand for use in replacement in the winter season. This will avoid getting stuck in the middle of a snowstorm. Or not having a replacement, or being able to purchase one when the stores are closed. Personally,I would rather have a couple of extra sets of shear pins than have to shovel snow.

AddThis Social Bookmark Button

Quick Start Guide – Snow Thrower

February 21st, 2015 ernie Posted in Repairs & Mtce | No Comments »

Quick Start Guide - Snow ThrowerWhether you refer to the machine in the picture as a snow thrower or a snow blower, it is all the same when it comes to developing a Quick Start Guide – Snow Thrower for these machines. We have put together a quick start guide – a snow thrower list of tips for making sure that you can always start your snow thrower easily and also use one of these machines safely. They are powerful and have exposed moving parts that can easily damage something or a person. Pay them some respect and they will move mountains of snow for you for many years.

Quick Start Guide – Snow Thrower – Tips

  • Use fresh gasoline and never allow gasoline to sit in the gas tank for an extended period of time
  • Use gas stabilizer to keep the gasoline fresh for longer periods and to also avoid gumming up the fuel system
  • Change the oil at least once every season and more often if your machine is on the go every day, perhaps as often as once a month or every 50 hours of operation
  • Clean and re-gap the spark plug annually and/or change it once every two years
  • Make sure that there is a solid connection from the spark plug wire to the spark plug
  • Start the engine every month to keep the fuel moving and to avoid gumming up from stagnant fuel sitting in fuel lines
  • Read and follow all safety guidelines before doing any maintenance on these machines.

Quick Start Guide – Snow Thrower – Safety

  • Read all of the safety instructions on the snow thrower and in the owner’s manual.
  • Use hearing protection and safety glasses whenever you are working or operating one of these machines
  • Wear excellent grip footwear so you don’t slip.
  • Heavy snow may require that you clear the snow more often or that you only take half a swath on each pass to avoid overloading the snow thrower
  • Clear your driveway of rocks, and sticks, every year before each snowfall.
  • Clean out the area around the blades and impeller removing all snow. Make sure that the engine is turned off before you attempt this.

Have fun with your snow thrower and remember to do all of the maintenance work before it gets really cold and unpleasant.

AddThis Social Bookmark Button

Basic Guide to Snow Blower Maintenance

February 14th, 2015 ernie Posted in Maintenance | No Comments »

Basic Guide to Snow Blower MaintenanceA snow blower properly maintained will last for many years, providing great service and starting easily every time. There are challenges since it is one of the machines which has a lot of down time and needs clean oil and gasoline to continue running at optimum levels. We will review some of the requirements to maintaining a snow blower and provide a basic guide to snow blower maintenance in this post. We need to emphasize that every operator and consumer who plans to conduct their own snow blower maintenance should first read the service manual and follow all safety precautions before beginning any work. They are big, powerful and can damage material and people working on them easily. Be cautious and careful.

Basic Guide to Snow Blower Maintenance

The first step to maintenance in all situations is to disconnect the spark plug wire so that the engine cannot start by accident. This is critical and for your own safety.

  • Change the Oil
  • Inspect and Replace Belts
  • Check scraper bars and skid shoes
  • Change the spark plug
  • Check shear pins
  • check starter chord
  • Fuel system maintenance
  • Tighten all bolts

A few words about each area will help do it yourself consumers complete all maintenance issues:

Change the Oil: at least once per year and more often if you use your snow blower a great deal. Check your owners manual for recommended frequency.

Inspect and Replace Belts: replace any frayed or worn belts before they break in the middle of winter when it is really cold

Check scraper bars and skid shoes: and adjust them to ensure proper scraping of your driveway

Change the spark plug: at least once per two years or more often depending on the owners manual recommendations. Cleaning and regapping is also recommended each year.

Check shear pins: and replace any that are worn or in danger of shearing off. Grease the auger at the same time

Check starter chord: and replace as needed

Fuel system maintenance: Always use clean fresh gasoline, use gasoline products to reduce gum forming in the carb and clean the filter every year.

Tighten all bolts: vibration can loosen bolts from time to time. tighten all bolts that are visible.

The best time for snow blower maintenance is in the late spring, summer or fall when temperatures make it easier to work on these machines. A break down in cold weather is not fun at all especially if you need to shovel a lot of snow and complete repairs in freezing temperatures.

AddThis Social Bookmark Button

Changing the spark plug on your snowblower

January 30th, 2015 ernie Posted in Repairs & Mtce | No Comments »

Changing the spark plug on your snowblowerAt the very minimum, the spark plug on your snowblower should be inspected every season and replaced as required. Follow the proper safety guidelines as outlined in your manual to ensure that no accidents occur. Changing the spark plug on your snowblower is not difficult. Start by disconnecting the spark plug lead from the spark plug as shown in the picture and remove any debris from around the spark plug before you remove the spark plug from the engine. This will stop any debris from getting into your engine through the spark plug hole.

Changing the spark plug on your snowblower

Once you have removed the spark plug using a socket wrench, from the engine, use a wire brush to clean the spark plug of any light deposits. You mean need to sand it slightly to remove harder deposits. If there are heavy deposits you may want to replace the spark plug. Once you have cleaned and sanded the spark plug you should regap the plug using a gapping tool to ensure that your spark plug delivers the proper spec for the spark. Note, that it is extremely important to have the correct gap on the spark plug, otherwise your engine may not start at all or run rough due to a poor spark.  Reinstall the spark plug and attach the wire.

You will want to test the engine and ensure that it runs smoothly with the new spark plug or the clean old plug. If you have any doubt at all about the spark plug condition replace it with a brand-new one using the recommended spark plug part for your snowblower. Always measure the gap on the plug even if it is a new one and set it to the correct specification for your engine.

Change the Oil in the Engine at the Same Time

Routine maintenance also suggests that the engine oil should be drained and new oil installed at least once per year and more often if your snowblower is being used a lot. Some snowblower manuals will suggest changing the oil at least once every 50 hours of operation or even more often. Check your manual for the recommended oil change frequency.

Before you open the drain plug, run the engine for a few minutes. This will warm the oil up so that it flows freely. Place a container of some kind under the oil drain spout. Capture the oil and dispose of it in a proper manner. Allow it to drip out until all oil is fully drained. Then reattached the oil plug. Add the proper amount of oil to the engine. Start the engine to allow the new oil to circulate and also warm-up.

Once the engine has run for a few minutes, shut it off, wait thirty seconds, and then measure the oil level to ensure that you have enough oil as recommended by the manufacturer. Add more as needed. If you added too much you will need to drain some off, otherwise, you risk damaging the seals in the engine. For more repair information for your snow blower, click here.

Save

AddThis Social Bookmark Button


?>


Web Content Development