Replace the Auger Drive Belt on the John Deere Snowblowers
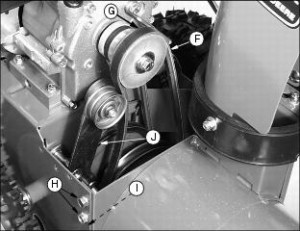
 One of our readers left the following comment on one of our posts about Replace the Auger Drive Belt. We thought it was so valuable, that we decided to add it as a main posting on our blog. The picture on the left shows the cover removed as discussed in step 5. These instructions are available for those people that are handy with working on engines and machines. If this is not your thing, have a professional do the work for you. Above all, follow the appropriate safety instructions. Make sure the spark plug is disconnected so that the engine cannot start accidentally while being worked on.
Replace the Auger Drive Belt
Hard to find instructions: To replace the Auger Drive Belt on the John Deere Snowblowers (827E, 928E, 1028E, 1130SE, 1330SE, 1332PE), Contributed by terry_angers@hotmail.com
1. Lockout ignition so no accidental start (eg remove spark plug wire)
2. Ensure gas tank is closed tightly and fuel is turned off.
3. Raise unit into service position (onto face of auger) so you can remove the bottom plate. Bottom plate is held on with 4 bolts. It is not absolutely required to remove the plate, but it makes it easier to remove old and install new belt.
4. Return unit to normal position
5. Remove the plastic belt cover shroud (black plastic section between ejection Chute and the engine. This is held on with two bolts, one on each side
6. Lock Auger Drive engagement handle into ON position (easily down by using a squeeze clamp to hold it in place or tape / wire / other)
Careful Next Steps
7. Partially separate the main body of the snowblower from the auger housing to allow room to remove / install the belt. There are six bolts securing the two halves. ONLY REMOVE the top two bolts on each side. Then JUST LOOSEN slightly the bottom two bolts. The back half of the snowblower will tilt backwards; the auger housing forwards. You only need to let it tilt a small amount to be able to easily slide the new belt in place.
8. Once belt is around the lower large pulley, reattach the snowblower body securely with all six bolts before finalizing belt onto the small upper pulley.
9. If you have not forgotten to lock the auger drive handle down, it will not be hard to rotate the new belt with some pressure onto the upper pulley. Check that the belt is oriented around the idle pulley in the same manner as the traction belt.
10. The upper “belt guide” rod should be about 1/8” from the belt when the auger drive handle is down. Adjust position if needed by loosening mount bolt.
11. The amount of Deflection the new belt should have is a little more than ½” with moderate pressure.
Check Before you Reassemble
12. Check the Auger drive cable length adjustment to confirm it is not too tight or has excess slack.
13. Check Pulley alignment to ensure that the idler pulley is in alignment with the upper and lower pulleys. You may need to bend the pulley mount plate a very small amount in either direction to ensure alignment (there is not a direct adjustment) the plate can be pressured with two small lengths of wood (eg 1”x1” x 12”) when brace against the housing
14. Reinstall the Belt cover
15. Reinstall the bottom plate
16. Turn on fuel and enable ignition
17. Start the engine and test that the belts and auger are working properly
You can follow any responses to this entry through the RSS 2.0 feed. You can leave a response, or trackback from your own site.


June 21st, 2017 at 4:55 pm
On STEP 7, a soon as you loosen the lower bolts, the back half will drop to the ground, completely separating the two halves. This will make it difficult to piece them back together in proper alignment. The rear handles must be supported in an upright position.
September 22nd, 2021 at 5:44 am
marketing account manager
blog topic